在Android的framework中已经提供了很多控件,每一个控件也都提供了很多的API接口,由于篇幅关系,在“UI篇”中只会列举出这些控件的基本用法,更复杂的用法请自行搜索。
第一节 概述
在Android应用程序中,使用View和ViewGroup类来创建用户界面。
-  View对象是用户界面的基础单元,如文本框和按钮等。
-  ViewGroup对象是一个容器,可以包含View对象在其内部,各个View会按照不同的规则进行排列,像线性布局、相对布局。
-  ViewGroup类是View类的子类,它内部既可以包含View对象,也可以包含另一个ViewGroup。
View的层次结构
通常,Activity的界面会众多控件组成,它们的组织结构是这样的:
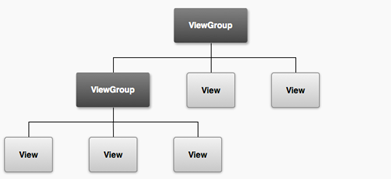
我们把这个结构,称为一个“View hierarchy tree”(View树)。
提示:
Android会从树的顶部依次解析你的布局中的元素,并把它们添加到界面中,由于这些是依次绘制的,所以如果有位置重叠的元素,那么最后绘制的元素将位于之前在那个位置绘制的对象之上。
第二节 常用术语
属性(Attributes)
使用XML文件构建用户界面时,每个View和ViewGroup对象都对应一个XML标签,同时不同的标签支持不同的XML属性。比如:
-  TextView标签的textSize属性(字体大小)、textColor属性(字体颜色)。
-  LinearLayout标签的orientation属性(设置水平或垂直排列它的子元素)。
属性会被继承,因此View类中定义的属性,它的任何子类都可以直接使用(如id属性)。
id属性
android:id属性用来唯一标识XML布局文件里的某个View,它的语法是:1
android:id="@+id/my_button"
语句解释:
-  开头的@符是一个资源标识符,指示XML解析器接应该继续解析后面的字符串。
-  在@符后面可以跟随drawable、id、string等字符,其中id则标识了它是一个id资源。
-  “+”号意味着如果在R.id类中没有对应的字段的话,则必须创建它并且要把它添加到我们的资源文件中(R.java文件),如果有了则不会再次创建。
当引用一个Android内部的资源id时,不需要“+”号,但必须像下例那样添加android包命名空间:1
android:id="@android:id/empty"
带有android包命名空间的地方,说明我们应用的是来自android.R资源类的一个id,而不是本地资源类。
布局参数
每个ViewGroup类都实现了一个嵌套类,这个类继承了ViewGroup.LayoutParams。
这个子类封装了ViewGroup类的每个子View的布局信息(尺寸、位置等)。如下图所示:
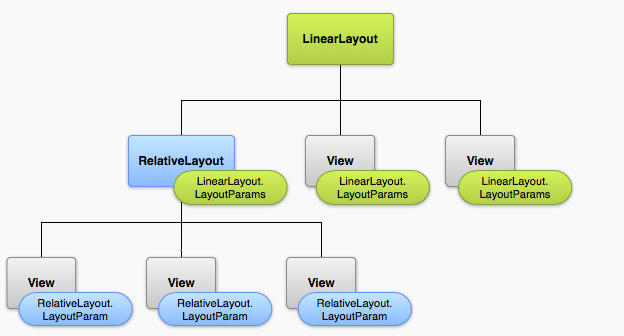
每个子元素都应该要定义适合它的父元素的LayoutParam子类:
比如被放入到LinearLayout的View对象应该为它指定一个LinearLayout.LayoutParams对象。
布局位置
一个View就是一个矩形,它用矩形的左上角顶点坐标来表述它的位置,并且用宽和高来表述它的两边的尺寸:
-  View类的getLeft()方法返回值代表了这个View的左上角的X坐标。
-  View类的getTop()方法的返回值代表了这个View的左上角的Y坐标。
-  View类的getWidth()方法的返回值代表了这个View的宽度。
-  View类的getHeight()方法的返回值代表了这个View的高度。
这四个方法的返回值的单位都是像素,而且返回值是相对它的父元素的位置,也就是说:
当getLeft方法返回20时,就意味着这个View对象被定为在距离它的父元素的左边缘的右边20个像素的位置。
尺寸
一个View对象的尺寸(size)用宽和高来表述,一个View对象实际上有两对宽和高的值。
第一对是被叫做测量宽度和测量高度。
-  这两个尺寸定义了一个View对象在它的父元素中想要的大小。
-  调用getMeasuredWidth()和getMeasuredHeight()方法即可获得。
第二对被简单的叫做宽度和高度,或者某些时候被叫做描画宽度和描画高度。
-  这两个尺寸定义了这个View对象在屏幕上的实际描画和布局尺寸。
-  调用getWidth()和getHeight()方法即可获得。
至于为什么要存在两对宽高,后面会有介绍。
第三节 常用布局
LinearLayout
线性布局是一个视图组,它所有的子视图都在一个方向对齐,水平或者垂直。
线性布局的所有子视图排列都是一个靠着另一个,因此:
-  垂直线性布局:布局内的所有控件,每个控件独占一行,所有控件从上到下垂直排放 。
-  水平线性布局:布局内的所有控件从左到右排在一行中,若当前屏幕显示不下,则也不会另起一行。 整个行的行高,为高度最高的那个组件的高度。
属性android:orientation指出线性布局的方式(默认值为水平布局),取值有两个:
-  垂直布局:vertical
-  水平布局:horizontal
范例1:main.xml文件。1
2
3
4
5
6<LinearLayout
xmlns:android="http://schemas.android.com/apk/res/android"
android:layout_width="match_parent" android:layout_height="match_parent"
android:orientation="horizontal">
</LinearLayout>
LinearLayout还支持给单独的子View分配权重(通过android:layout_weight属性),默认权重值是0。
例如,如果有三个文本框,其中的两个声明的权重值是1,而另一个没有声明权重值(默认是0),那么第三个没有权重的文本框只会占据它的内容所需要的区域,尺寸并不会变大。
此时系统会先绘制第三个文本框,然后再将剩余的空间交给前两个文本框平分。
如果第三个文本框的权重是2(而不是0),那么这就声明了它比其他的两个更重要,因此它会获得总的剩余空间的一半,而另外两个则会平分剩余的空间。
范例2:android:layout_weight属性。1
2
3
4
5
6
7
8
9
10
11
12
13
14
15<LinearLayout xmlns:android="http://schemas.android.com/apk/res/android"
android:layout_width="fill_parent"
android:layout_height="fill_parent"
android:orientation="vertical" >
<Button
android:layout_width="wrap_content"
android:layout_height="wrap_content"
android:layout_weight="1"
android:text="click1" />
<Button
android:layout_width="wrap_content"
android:layout_height="wrap_content"
android:layout_weight="1"
android:text="click2" />
</LinearLayout>
语句解释:
-  LinearLayout的子控件使用android:layout_weight属性来为自己设置权重。
-  LinearLayout按照其android:orientation属性设置的方向,将其自身的宽度或高度平均分成若干分。
   -  平均分成多少份数是由其所有子View的android:layout_weight属性值的总和。本范例中LinearLayout的高度会被分成2份,两个Button将各占据一半的高度。
-  若想保持某个子View的原始尺寸,则可以不设置android:layout_weight属性,或者将其值设为0。
RelativeLayout
RelativeLayout顾名思义,相对布局,在这个容器内部的子元素们可以使用彼此之间的相对位置或者和父容器间的相对位置来进行定位。
默认情况下,所有的子视图在布局的左上角,所以你必须定义每个视图的位置。
范例1:相对布局。1
2
3
4
5
6
7
8
9
10
11
12
13
14
15
16
17
18
19
20
21
22
23
24
25
26
27
28
29
30<RelativeLayout xmlns:android="http://schemas.android.com/apk/res/android"
android:layout_width="match_parent"
android:layout_height="match_parent"
android:padding="10dp">
<TextView
android:layout_width="match_parent"
android:layout_height="wrap_content"
android:text="@string/text"
android:id="@+id/notify"/>
<EditText
android:id="@+id/content"
android:layout_width="match_parent"
android:layout_height="wrap_content"
android:layout_below="@+id/notify"/>
<Button
android:layout_width="wrap_content"
android:layout_height="wrap_content"
android:id="@+id/ok"
android:text="确定"
android:layout_below="@+id/content"
android:layout_alignRight="@+id/content"/>
<Button
android:layout_width="wrap_content"
android:layout_height="wrap_content"
android:id="@+id/cancel"
android:text="取消"
android:layout_toLeftOf="@+id/ok"
android:layout_alignTop="@+id/ok"
android:layout_marginRight="20dp"/>
</RelativeLayout>
范例2:属性解释。1
2
3
4
5
6
7
8
9
10
11
12
13
14
15
16android:layout_above 将当前控件的底部置于给定ID的控件之上。
android:layout_below 将当前控件的顶部置于给定ID的控件之下。
android:layout_toLeftOf 将当前控件的右边缘和给定ID的控件的左边缘对齐。
android:layout_toRightOf 将当前控件的左边缘和给定ID的控件的右边缘对齐。
android:layout_alignBottom 将当前控件的底部边缘与给定ID控件的底部边缘对齐。
android:layout_alignLeft 将当前控件的左边缘与给定ID控件的左边缘对齐。
android:layout_alignRight 将当前控件的右边缘与给定ID控件的右边缘对齐。
android:layout_alignTop 将当前控件的顶部边缘与给定ID控件的顶部对齐。
android:layout_alignBaseline 将当前控件的baseline和给定ID的控件的baseline对齐。
android:alignParentBottom 若为true,则将该控件的底部和父控件的底部对齐。
android:layout_alignParentLeft 若为true,则将该控件的左边与父控件的左边对齐。
android:layout_alignParentRight 若为true,则将该控件的右边与父控件的右边对齐。
android:layout_alignParentTop 若为true,则将该控件的顶部与父控件的顶部对齐。
android:layout_centerHorizontal 若为true,则该控件将被至于水平方向的中央。
android:layout_centerVertical 若为true,则该控件将被至于垂直方向的中央。
android:layout_centerInParent 若为true,该控件将被至于父控件水平方向和垂直方向的中央。
范例3:padding。1
2
3
4
5android:padding
android:paddingLeft="10dp"
android:paddingTop="20dp"
android:paddingRight="30dp"
android:paddingBottom="30dp"
语句解释:
-  使用android:padding属性设置当前控件的边框与正文的内容之间的间距。
-  也可以使用其他四个属性,为当前控件的某条边框设置间距。
范例4:margin。1
2
3
4
5
6
7
8
9
10
11<RelativeLayout
xmlns:android="http://schemas.android.com/apk/res/android"
android:layout_width="fill_parent"
android:layout_height="fill_parent">
<Button
android:layout_marginLeft="30dp"
android:layout_marginTop="30dp"
android:layout_width="wrap_content"
android:layout_height="wrap_content"
android:text="按钮" />
</RelativeLayout>
语句解释:
-  使用android:layout_margin属性可以设置当前控件与相邻控件之间的间距。
-  在相对布局中,控件的位置可以通过四个属性来唯一确定:左上角坐标、控件的宽高。
TableLayout
TableLayout代表表格页面布局,它不显示行、列或单元格的边框线,表的每行会有多个带有单元格的列,单元格可以为空。
范例1:main.xml文件。1
2
3
4
5
6
7<TableLayout xmlns:android="http://schemas.android.com/apk/res/android"
android:layout_width="match_parent" android:layout_height="match_parent">
<TableRow>
<View />
<View />
</TableRow>
</TableLayout>
语句解释:
-  表格中的每一行使用<TableRow>标签来指定。行中有几个<View>则该行就拥有几列。
-  在表格布局中,每个<View>的具体的宽高不要再使用关键字来指定。而应该使用具体的数值。
-  在表格布局中,不再必须要为每一个View都提供layout_width和layout_height属性。
TableLayout的每行有0或多个单元格,每个单元格都可以定义为任意类型的View对象。
范例2:其他属性。1
2
3
4
5
6
7
8<TableLayout xmlns:android="http://schemas.android.com/apk/res/android"
android:layout_width="match_parent" android:layout_height="match_parent"
android:stretchColumns="1" android:shrinkColumns="1">
<TableRow>
<View />
<View />
</TableRow>
</TableLayout>
语句解释:
-  属性android:shrinkColumns:若某行超长,则收缩指定的列,列的编号从0开始。
-  属性android:stretchColumns:若某行中空间未填满,则拉伸指定的列,编号从0开始。
范例3:跨列。1
2
3
4
5
6
7
8
9
10
11
12
13
14
15
16
17
18
19
20
21
22<TableLayout
xmlns:android="http://schemas.android.com/apk/res/android"
android:layout_width="fill_parent"
android:layout_height="fill_parent">
<TableRow>
<Button
android:layout_width="wrap_content"
android:layout_height="wrap_content"
android:layout_span="2"
android:text="按钮" />
</TableRow>
<TableRow>
<Button
android:layout_width="wrap_content"
android:layout_height="wrap_content"
android:text="按钮" />
<Button
android:layout_width="wrap_content"
android:layout_height="wrap_content"
android:text="按钮" />
</TableRow>
</TableLayout>
语句解释:
-  使用layout_span属性可以设置某列的跨度。
FrameLayout
FrameLayout是最简单的布局对象类型。
在帧布局中,组件是以覆盖的方式排列的,即将两个组件A和B依次放入帧布局中时,B组件会压在A组件的上方,这类似于一摞扑克牌。
范例1:帧式布局。1
2
3
4
5
6
7<FrameLayout
xmlns:android="http://schemas.android.com/apk/res/android"
android:layout_width="match_parent"
android:layout_height="match_parent">
<View />
<View />
</FrameLayout>
语句解释:
-  如:使用播放器看电影时,点击暂停按钮后,屏幕上会多出一个“继续播放”按钮 。
范例2:前景图像。1
2
3
4
5
6
7
8
9
10
11
12
13
14
15
16
17
18<FrameLayout xmlns:android="http://schemas.android.com/apk/res/android"
android:layout_width="match_parent"
android:layout_height="match_parent"
android:foreground="@drawable/logo"
android:foregroundGravity="right|bottom">
<TextView
android:layout_width="200dp"
android:layout_height="200dp"
android:background="#FF6143" />
<TextView
android:layout_width="150dp"
android:layout_height="150dp"
android:background="#7BFE00" />
<TextView
android:layout_width="100dp"
android:layout_height="100dp"
android:background="#FFFF00" />
</FrameLayout>
语句解释:
-  所谓前景图像,即永远处于帧布局最顶层的图像,比如实现用户头像的圆角效果,可以用到此功能。
-  属性android:foreground:设置该帧布局容器的前景图像。
-  属性android:foregroundGravity:设置前景图像在FrameLayout内部的显示位置。取值有:
   -  right、bottom、top等,如果需要多个值,值之间要使用“|”间隔,本范例的位置为右下角。
第四节 常用控件
本章将介绍一下Android中常用的控件,如:TextView、Button、RadioButton等。
TextView
TextView是一个文本控件,用来显示一行文本,在文本中可以包含图片、超链接、HTML代码等。
在XML文件中使用<TextView>标签可以构建出一个文本控件,每个<TextView>标签都对应于TextView类的一个实例。
范例1:<TextView>标签。1
2
3
4
5<TextView
android:id="@+id/notify"
android:layout_width="match_parent"
android:layout_height="wrap_content"
android:text="请输入您的联系电话:"/>
属性解释:1
2
3
4android:id 为当前标签指定一个ID,ID保存在R.java中。 可选。
android:layout_width 指出当前控件在其父组件中所占据的宽度。 可选。
android:layout_height 指出当前控件在其父组件中所占据的高度。 可选。
android:text 指出标签所要显示的数据,可直接指定字符串常量。 可选。
提示:
-  表达式:“@+id/notify”的含义:向R的内部类id中添加一个名为notify静态常量,若R中不存在内部类id,则要先创建内部类id ,若存在,则不会再建立,而是直接在其内创建一个名为notify的静态常量。 若notify静态常量也存在,则不执行任何操作,仅会将notify的引用返回来。
-  当前组件在其父组件中所占据的宽度和高度的值可以是:
   -  具体的数值。如:89dp 。
   -  关键字:match_parent、fill_parent、wrap_content。
范例2:响应点击事件。1
2
3
4
5
6
7<TextView
android:id="@+id/notify"
android:layout_width="match_parent"
android:layout_height="wrap_content"
android:text="请输入您的联系电话:"
android:clickable="true"
android:onClick="onClick"/>
属性解释:1
2
3
4
5
6
7
8
9android:onClick 在当前组件被点击时,应该调用的处理点击事件的方法。该方法需要在引用当前xml文件的Activity中定义。
方法的签名应该为: public void 方法名(View view)
即:
|- 必须是public的。
|- 必须是void的。
|- 必须有且只有一个View类型的参数。
|- 其中“方法名”是android:onClick属性的值。
android:clickable 设置当前View是否可以接收点击事件,若设置为false则android:onClick属性的值将被忽略。
在代码中可以通过调用TextView类的setText()和getText()方法,来设置和获取TextView对象所显示的文字。
范例3:背景色、单行显示、字体大小、文字对其方式。1
2
3
4
5
6
7
8
9<TextView
android:layout_width="match_parent"
android:layout_height="wrap_content"
android:background="#cccfff"
android:text="@string/text"
android:singleLine="true"
android:id="@+id/notify"
android:textSize="20sp"
android:gravity="right"/>
属性解释:1
2
3
4android:background 设置当前标签控件所占据的空间的背景色。
android:singleLine 设置标签上的文字,是否全部显示在同一行中。若是,当文字一行显示不开时,则使用 … 代替。
android:textSize 设置字体的大小,通常的单位为sp。
android:gravity 设置标签上的文字在当前标签控件所占据的空间中的对齐方式。
TextView是支持滚动条滑动的,当TextView的内容超出了其宽或高则就可以使用其内置滚动条了。
范例4:启用内置水平、垂直滚动条。1
2
3
4
5
6
7
8
9
10
11
12
13
14
15<!-- 水平滚动条 -->
<TextView
android:id="@+id/tv"
android:layout_width="310dp"
android:layout_height="110dp"
android:scrollHorizontally="true"
android:text="bbbbb" />
<!-- 垂直滚动条 -->
<TextView
android:id="@+id/tv2"
android:layout_width="310dp"
android:layout_height="110dp"
android:scrollbars="vertical"
android:text="bbbbb" />
在Activity中还需要写上如下代码:1
2TextView text = (TextView) findViewById(R.id.tv);
text.setMovementMethod(ScrollingMovementMethod.getInstance());
值得注意的是,水平和垂直滚动条不可以同时存在。
范例5:发光字体。1
2
3
4
5
6
7
8
9
10<TextView
android:layout_width="fill_parent"
android:layout_height="wrap_content"
android:shadowColor="@color/blue"
android:shadowDx="-2"
android:shadowDy="0"
android:shadowRadius="6"
android:text="曲 : 周杰伦/ 词:黄俊郎 "
android:textColor="@android:color/white"
android:textSize="16sp" />
属性解释:1
2
3
4android:shadowColor 设置文字的阴影色。
android:shadowDx 设置文字的阴影,距离文字的水平偏移量。
android:shadowDy 设置文字的阴影,距离文字的垂直偏移量。
android:shadowRadius 设置文字的阴影半径(范围)。
范例6:设置行数。1
2
3
4
5
6<TextView
android:layout_width="50dp"
android:layout_height="350dp"
android:background="@color/grey"
android:lines="2"
android:text="AAAABBBBBBBBBCCCCCCC" />
语句解释:
-  若layout_height属性的值为wrap_content且也设置了android:lines属性的值,则TextView的最终高度为行高*android:lines的值。
-  若layout_height属性的值为具体的数值,则TextView的最终高度就是该属性的值。
   -  若指定了android:lines属性,且TextView的实际内容超过了android:lines的值,则TextView就只会显示android:text属性的前android:lines行的内容。 注意:
      -  即便TextView的高度完全可以显示更多的内容,TextView也不会显示。
      -  虽然只显示指定的行内容,但调用TextView的getText()方法返回的内容确是完整的。
范例7:ellipsize。1
2
3
4
5
6<TextView
android:layout_width="49dp"
android:layout_height="wrap_content"
android:ellipsize="end"
android:singleLine="true"
android:text="AAAABBBBB" />
语句解释:
-  使用android:ellipsize属性可以设置,当前TextView显示不了所有的文本时,使用“…”来代替未显示的文本。取值:
   -  start:在文本的开始位置显示“…”。
   -  middle:在文本的中间位置显示“…”。
   -  end:在文本的结束位置显示“…”。
   -  marquee:使用循环滚动方式显示文本。
-  使用android:lines="1" 是不会显示出“…”的。
ImageView
ImageView是一个用来显示图片的控件,在XML文件中使用<ImageView>标签表示。
范例1:<ImageView>标签。1
2
3
4
5<ImageView
android:src="@drawable/icon"
android:layout_width="wrap_content"
android:layout_height="match_parent"
android:layout_gravity="center" />
属性解释:1
2
3
4android:src 指定图片的资源ID。
android:layout_gravity 指定当前控件在其父元素内部的对齐方式。
常用对齐方式:
水平左对齐(left)、水平右对齐(right)、水平垂直居中(center)、垂直顶对齐(top)、垂直底部对齐(bottom)。
范例2:动态修改显示图片。1
2
3
4
5
6
7<!-- 当图片被点击的时候,会自动调用Activity的onImageViewClick方法。 -->
<ImageView
android:layout_width="wrap_content"
android:layout_height="wrap_content"
android:id="@+id/img"
android:src="@drawable/a"
android:onClick="onImageViewClick"/>
Java代码:1
2
3
4
5
6
7
8public class ViewTextActivity extends Activity {
public void onImageViewClick(View view){
// 调用Activity类的方法,并指定ID,从当前xml布局文件中获取ImageView控件。
ImageView img = (ImageView) this.findViewById(R.id.img);
// 修改ImageView控件所显示的图片。
img.setImageResource(R.drawable.b);
}
}
ProgressBar
ProgressBar是一个进度条控件,在XML文件中使用<ProgressBar>标签定义一个进度条。
范例1:进度条。1
2
3
4
5
6<ProgressBar
android:id="@+id/firstPro"
style="?android:attr/progressBarStyleHorizontal"
android:layout_width="match_parent"
android:layout_height="wrap_content"
android:visibility="gone"/>
属性解释:1
2style 进度条有圆形和条形两种显示风格,默认为圆形风格。使用style属性可以设置Progress显示风格。
android:visibility 此属性继承自View类,任何View的子类都可以使用它。此属性来设置当前控件是否可见。
范例2:ProgressBar类的常用方法。1
2
3
4
5
6
7
8
9
10
11
12
13
14// 设置ProgressBar对象的当前进度值。
public synchronized void setProgress (int progress)
// 设置ProgressBar对象的最大值。默认为100。
public synchronized void setMax (int max)
// 获取ProgressBar对象的当前值。
public synchronized int getProgress ()
// 获取ProgressBar对象的第二进度条的当前值。
public synchronized int getSecondaryProgress ()
// 设置ProgressBar对象的第二进度条的当前值。 第二进度条通常用来显示缓冲的进度,如:视频缓冲进度。
public synchronized void setSecondaryProgress (int secondaryProgress)
范例3:代码片段。1
2
3
4
5
6
7
8
9
10
11
12class UpdateBar extends Thread{
private int i = 0;
public void run(){
progressbar.setMax(100);
while(progressbar.getProgress() <= 100){
progressbar.setProgress(i++);
try {
Thread.sleep(200);
} catch (InterruptedException e) {}
}
}
}
语句解释:
-  实例化出一个UpdateBar的对象,然后启动它即可。
-  进度条的实现原理:通过线程不断的调用进度条的setProgress方法来更新进度条。
SeekBar
SeekBar是一个可拖动的进度条。用户可以通过拖动手柄,来调整进度条的当前位置。一般用于音乐、视频播放器中。

SeekBar是ProgressBar的间接子类,因此可以按照操作ProgressBar的方式,操作SeekBar。
范例1:SeekBar标签。1
2
3
4<SeekBar
android:id="@+id/seekBar"
android:layout_width="match_parent"
android:layout_height="wrap_content"/>
范例2:SeekBar类的常用方法。1
2// 为当前SeekBar添加一个监听器。当SeekBar的值被改变、被拖动时会触发相应的事件。
public void setOnSeekBarChangeListener (SeekBar.OnSeekBarChangeListener l)
范例3:SeekBar.OnSeekBarChangeListener接口。1
2
3
4
5
6
7
8
9
10
11// 当SeekBar的值被改变时,触发此方法。
// progress:SeekBar的当前值。
// fromUser:当前事件是否由用户拖动或点击SeekBar而导致的。
// 因为SeekBar的值改变有程序调用setProgress()和用户拖动或点击SeekBar两种情况。
public abstract void onProgressChanged (SeekBar seekBar, int progress, boolean fromUser)
// 当SeekBar被用户点击时,调用此方法。此方法只在用户按下SeekBar时调用一次。
public abstract void onStartTrackingTouch (SeekBar seekBar)
// 当用户从SeekBar上抬起了手指后,调用此方法。此方法只会调用一次。
public abstract void onStopTrackingTouch (SeekBar seekBar)
滚动条
在Android中有垂直滚动条(ScrollView)和水平滚动条(HorizontalScrollView)两种。
范例1:添加垂直滚动条。1
2
3
4
5
6
7
8<ScrollView
android:layout_width="match_parent"
android:layout_height="match_parent">
<TextView
android:id="@+id/content"
android:layout_width="wrap_content"
android:layout_height="wrap_content"/>
</ScrollView>
语句解释:
-  当控件的内容超出控件的大小时,垂直滚动条就会显示出来。
-  关于ScrollView有三点注意事项:
   -  首先,ScrollView仅在垂直方向上有滚动条。
   -  然后,ScrollView内仅可以包含一个子View。
   -  最后,子View可以是一个简单的View,如按钮、标签等,也可以是一个布局。
范例2:水平滚动条。1
2
3
4
5
6
7
8
9
10<HorizontalScrollView
android:layout_width="200dp"
android:layout_height="200dp"
android:id="@+id/horizontalScroll">
<TextView
android:layout_width="fill_parent"
android:layout_height="wrap_content"
android:id="@+id/content"
android:text="@string/hello" />
</HorizontalScrollView>
语句解释:
-  当控件的内容超出控件的大小时,垂直滚动条就会显示出来。
View类提供了一个scrollBy (int x, int y)方法,用来将控件的滚动条从当前位置上,向右移动x像素,向下方移动y像素。
-  在使用ScrollView时参数x无效。
-  在使用HorizontalScrollView时参数y无效。
Button
Button表示一个按钮,按钮可以包括文字或者图标,或者两者兼而有之,当用户触摸到按钮时就会触发事件。

您可以以三种方式创建按钮布局:1
2
3
4
5
6
7
8
9
10
11
12
13
14
15
16
17
18<!-- 有文字的按钮 -->
<Button
android:layout_width="wrap_content"
android:layout_height="wrap_content"
android:text="@string/button_text"/>
<!-- 有图标的按钮 -->
<ImageButton
android:layout_width="wrap_content"
android:layout_height="wrap_content"
android:src="@drawable/button_icon"/>
<!-- 有文字和图标的按钮 -->
<Button
android:layout_width="wrap_content"
android:layout_height="wrap_content"
android:text="@string/button_text"
android:drawableLeft="@drawable/button_icon"/>
使用事件监听器
您也可以声明单击事件处理程序,而不是在XML布局中通过android:clickable属性。这可能是必要的,如果你在运行时实例化<Button>,或者你需要在一<Fragment>子类中声明单击事件。
为了声明事件处理程序,你需要创建一个View.OnClickListener类的对象,并将它分配给按钮。例如:1
2
3
4
5
6
7Button button = (Button) findViewById(R.id.button_send);
// 为当前Button对象添加一个事件监听器。当用户点击此按钮时,会触发此监听器。
button.setOnClickListener(new View.OnClickListener() {
public void onClick(View v) {
// Do something in response to button click
}
});
无边框按钮
一种有用的设计是无边框按钮。无边框按钮与基本按钮相似,但是无边框按钮没有无边框或背景,但在不同状态如点击时,会改变外观。要创建一个无边框“按钮,为按钮应用borderlessButtonStyle样式。

实例代码为:1
2
3
4
5
6
7<Button
android:id="@+id/button_send"
android:layout_width="wrap_content"
android:layout_height="wrap_content"
android:text="@string/button_send"
android:onClick="sendMessage"
style="?android:attr/borderlessButtonStyle" />
EditText
文本框允许用户在应用程序中输入文本,在XML布局文件中添加<EditText>元素。
指定键盘类型
EditText可以限制用户不同的输入类型,如数字,日期,密码,或电子邮件地址。
你可以使用EditText对象的android:inputType属性指定输入类型的键盘,例如:1
2
3
4
5<EditText
android:id="@+id/email_address"
android:layout_width="fill_parent"
android:layout_height="wrap_content"
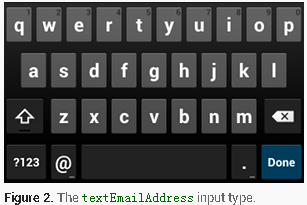
android:inputType="textEmailAddress" />
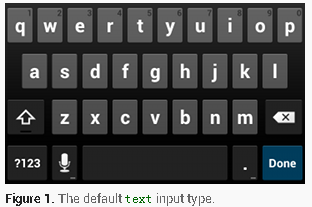
默认类型的软键盘:
textEmailAddress类型的软键盘:
针对不同的情况有几种不同的输入类型。你可以找到所有的文件中列出的android:inputType属性值:
-  text:普通的文本键盘。
-  textEmailAddress:普通的文本键盘,同时多一个“@”字符。
-  textUri:普通的文本键盘,同时多一个“/”字符。
-  number:普通的数字键盘。
-  phone:电话号码类型的键盘。
下面列出了常见的定义键盘行为的inputType值:
-  textCapSentences:普通的文本键盘,将每个新句子的第一个字母转为大写。
-  textCapWords:普通的文本键盘,将每个单词的第一个字母转为大写,适用于人名。
-  textAutoCorrect:普通的文本键盘,纠正一般的单词拼写错误。
-  textPassword:普通的文本键盘,所有输入到文本框中的内容都回显为“•”符号。
-  textMultiLine:普通的文本键盘,允许用户输入包含换行符的长文本。
1 | <EditText |
指定键盘操作
除了改变键盘的输入类型,当用户完成输入时,android允许你指定特殊的按钮进行相应的操作,如把回车键作为 “搜索”或 “发送”操作。
您可以通过android:imeOptions属性设置指定的动作。例如,这里你可以指定发送的行为:1
2
3
4
5
6
7<EditText
android:id="@+id/editText"
android:layout_width="fill_parent"
android:layout_height="wrap_content"
android:imeOptions="actionSearch"
android:inputType="text"
android:text="actionSearch" />
这里举几个常用的常量值:
-  actionGo 去往,对应常量EditorInfo.IME_ACTION_GO。
-  actionSearch 搜索,对应常量EditorInfo.IME_ACTION_SEARCH。
-  actionSend 发送,对应常量EditorInfo.IME_ACTION_SEND。
-  actionNext 下一个,对应常量EditorInfo.IME_ACTION_NEXT。
-  actionDone 完成,对应常量EditorInfo.IME_ACTION_DONE。
-  actionNone 没有动作,对应常量EditorInfo.IME_ACTION_NONE。
提示:EditText的android:inputType属性的值默认是none,若不去修改它的默认值,则android:imeOptions属性是不起作用的,将none改为text即可。
响应按钮事件
如果您已指定键盘采用android:imeOptions属性,则可以使用TextView.OnEditorActionListener监听事件行为。1
2
3
4
5
6
7
8
9
10
11
12EditText editText = (EditText) findViewById(R.id.search);
editText.setOnEditorActionListener(new OnEditorActionListener() {
public boolean onEditorAction(TextView v, int actionId, KeyEvent event) {
boolean handled = false;
if (actionId == EditorInfo.IME_ACTION_SEND) {
sendMessage();
handled = true;
}
return handled;
}
});
语句解释:
-  OnEditorActionListener接口提供了一个回调方法onEditorAction。
其他用法
范例1:<EditText>标签。1
2
3
4
5
6<EditText
android:id="@+id/content"
android:layout_width="match_parent"
android:layout_height="wrap_content"
android:maxLines="1"
android:minLines="3"/>
属性解释:1
2
3
4
5android:id 一般都需要为文本框指定一个id,以便在Activity中引用此文本框。
android:minLines 设置文本框的高度,即最少可以容纳数据的行数。
android:maxLines 设置文本框的高度,即最多容纳数据的行数。多出的数据,不会导致文本框的高度变大。
android:password 若取值为true则密文显示当前文本框中的内容。
android:hint 设置文本框中的背景文字。用户向文本框输入数据时,背景文字会自动消失。
范例2:限制数据。1
2
3
4
5<EditText
android:id="@+id/content"
android:numeric="integer"
android:layout_width="match_parent"
android:layout_height="wrap_content"/>
语句解释:
-  若文本框需要用户只能输入数字,则android:numeric属性置为integer即可。 取值:
   -  decimal:0或正整数、小数。
   -  integer:0或正整数。
   -  signed:0、负、正整数。
-  使用android:phoneNumber="true"属性可以设置文本框,只接收电话号码。
-  使用android:digits="fee24a"属性可以枚举出当前TextView所能接收的字符,用户将无法输入其他字符。
-  属性android:inputType="number"的效果和android:numeric="integer" 一样。它们都会修改软件盘的布局。
范例3:EditText类常用方法。1
2
3
4
5
6
7
8
9
10
11// 以Editable类型的对象,将文本框中的数据返回。修改Editable对象中的数据会导致文本框中当前保存的数据一同被修改。
public Editable getText()
// 选择出文本框中的所有内容。
public void selectAll()
// 选择出文本框中的内容,从start(包括)开始到stop(不包括)结束。
public void setSelection(int start, int stop)
// 将文本框的当前输入位置,设置到指定位置的前面。 若下标<0或>上界则程序报错。
public void setSelection(int index)
范例4:Editable接口。1
2
3
4
5
6// 向当前对象中添加指定CharSequence对象。修改了Editable对象中的数据,会导致文本框中的数据同步改变。
// 若想获取EditText中的内容,可以调用Editable的toString方法。
public abstract Editable append(CharSequence text)
// 清空文本框中的数据。
public abstract void clear()
范例5:密码的显示和隐藏。1
2
3
4// 明文显示密码。
editText.setTransformationMethod(HideReturnsTransformationMethod.getInstance());
// 密文显示密码。
editText.setTransformationMethod(PasswordTransformationMethod.getInstance());
CheckBox
复选框(俗称多选按钮)允许用户从列表中选择一个或多个选项。通常,你应该在垂直的列表中显示每一个选项。
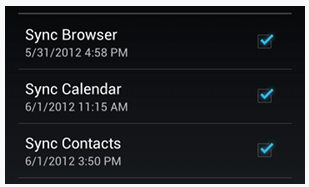
当你要创建一个复选框时,你就必须要在你的布局文件中创建一个CheckBox字段。因为一组复选框选项允许用户选择多个选项,而且每个复选框分开管理,你必须为每一个选项注册点击监听器。
在XML文件中使用<CheckBox>标签定义一个多选按钮,每个<CheckBox>标签都对应于CheckBox类的一个实例。1
2
3
4
5<CheckBox
android:layout_width="wrap_content"
android:layout_height="wrap_content"
android:id="@+id/java"
android:text="Java"/>
响应单击事件
当用户选择一个复选框中的选项时,该复选框对象接收onClick事件,当复选框的选中状态被改变时,该复选框对象接受onCheckedChange事件。 因此这两种方案都可以处理复选框的点击事件。
范例1:CheckBox类常用方法。1
2
3
4
5
6
7
8// 修改当前CheckBox的选定状态。true为选定,false为不选定。
public void setChecked(boolean checked)
// 查看当前CheckBox是否处于选定状态。
public boolean isChecked()
// 设置事件监听器。当当前按钮的选中状态改变时,会触发OnCheckedChange事件。
public void setOnCheckedChangeListener(CompoundButton.OnCheckedChangeListener listener)
范例2:CompoundButton.OnCheckedChangeListener接口。1
2
3
4// 当CheckBox触发OnCheckedChange事件时,事件监听器会触发此事件。
// buttonView :触发事件的CheckBox对象。
// isCheck :CheckBox对象是否处于选中状态。
public abstract void onCheckedChanged(CompoundButton buttonView, boolean isChecked)
范例3:事件监听。1
2
3
4
5
6CheckBox box = (CheckBox) this.findViewById(R.id.java);
box.setOnCheckedChangeListener(new OnCheckedChangeListener(){
public void onCheckedChanged(CompoundButton buttonView, boolean isChecked) {
System.out.println(buttonView.getText()+"被选中? "+isChecked);
}
});
CheckBox和RadioButton都继承自TextView ,因此它们都具有TextView类提供的方法。
范例4:监听onClick事件。1
2
3
4
5
6
7
8
9
10
11
12
13
14
15
16
17
18public void onCheckboxClicked(View view) {
boolean isChecked = ((CheckBox) view).isChecked();
switch(view.getId()) {
case R.id.checkbox_meat:
if (isChecked)
// Put some meat on the sandwich
else
// Remove the meat
break;
case R.id.checkbox_cheese:
if (isChecked)
// Cheese me
else
// I'm lactose intolerant
break;
// TODO: Veggie sandwich
}
}
RadioButton
复选框允许用户从一系列选项中选择其中某个选项。
如果认为有必要让用户看到所有并列的可选项,并且各个选项中只能有一个被选择,那么单选框是个好选择。

创建单个选项之前,需要在布局文件中创建选项按钮RadioButton。然而,因为复选按钮之间是互斥的,它们需要被放在同一个选项组框RadioGroup里。这样系统会认为在同一个选项组里每次只能有一个选项被选择。
即:
-  在xml文件中使用<RadioButton>标签定义一个单选按钮。
-  在xml文件中使用<RadioGroup>标签将多个单选按钮组成一个组,从而使组中的所有按钮同一时间只能有一个被选择。
-  在xml文件中每个<RadioButton>标签都对应于RadioButton类的一个实例。标签<RadioGroup> 也同样如此。
范例1:单选按钮。1
2
3
4
5
6
7
8
9
10
11
12
13
14
15<RadioGroup
android:id="@+id/group"
android:layout_width="match_parent"
android:layout_height="wrap_content" >
<RadioButton
android:id="@+id/boy"
android:text="男"
android:layout_width="wrap_content"
android:layout_height="wrap_content"/>
<RadioButton
android:id="@+id/girle"
android:text="女"
android:layout_width="wrap_content"
android:layout_height="wrap_content"/>
</RadioGroup>
范例2:RadioButton类。1
2
3
4
5// 修改当前RadioButton对象的选定状态。true为选定。false为不选定。
public void setChecked(boolean checked)
// 查看当前RadioButton对象是否处于选定状态。
public boolean isChecked()
范例3:RadioGroup类。1
2// 监听当前按钮组中的按钮,当用户的选择改变时,会触发此事件。
public void setOnCheckedChangeListener(RadioGroup.OnCheckedChangeListener listener)
范例4:RadioGroup.OnCheckedChangeListener接口。1
2
3
4// 监听当前按钮组中的按钮,当用户的选择改变时,会调用此方法。
// group :产生事件的RadioGroup对象。
// checkeId :当前被选中的RadioButton对象的id ,此id在R.java中定义。
public abstract void onCheckedChanged(RadioGroup group, int checkedId)
范例5:监听按钮组。1
2
3
4
5
6
7
8
9RadioGroup g = (RadioGroup) this.findViewById(R.id.group);
g.setOnCheckedChangeListener(
new OnCheckedChangeListener(){
public void onCheckedChanged(RadioGroup radiogroup, int checkedId) {
String sex = null;
sex = (R.id.boy == checkedId ? "男":"女");
System.out.println("您选择了:"+sex);
}
});
语句解释:
-  一般来说会在RadioGroup对象上添加事件监听器,当RadioGroup中的某个按钮的状态被改变了,就会触发onCheckedChanged方法。
-  当然直接在RadioButton上进行监听也是可以的,选择哪种方案就看具体情况了。
ToggleButton
ToggleButton是一个开关按钮,与普通Button的区别在于它有两种状态,选中和未选中。
Android有两种开关按钮,在Android4.0之前,你可以添加一个基本的ToggleButton开关按钮对象到布局文件。 Android 4.0(API 级别14)中介绍了另外一种叫做Switch的切换按钮,这个按钮提供一个滑动控件,可以通过添加Switch对象来实现。

Toggle Button和Switch控件都是CompoundButton的子类并且有着相同的功能,所以你可以用同样的方法来实现他们功能。
范例1:开关按钮。1
2
3
4
5
6
7
8
9
10
11
12
13
14<LinearLayout
xmlns:android="http://schemas.android.com/apk/res/android"
android:layout_width="fill_parent"
android:layout_height="fill_parent">
<ToggleButton
android:layout_width="wrap_content"
android:layout_height="wrap_content"
android:textOn="开"
android:textOff="关"
android:checked="true"
android:paddingRight="20dp"
android:onClick="onClick"
android:background="@drawable/toggle_btn_bg" />
</LinearLayout>
属性解释:1
2
3android:textOn 按钮处于选中状态时所要显示的文本。
android:textOff 按钮处于非选中状态时所要显示的文本。
android:checked 设置按钮的当前是否处于选中状态。
范例2:toggle_btn_bg.xml。1
2
3
4<selector xmlns:android="http://schemas.android.com/apk/res/android">
<item android:state_checked="true" android:drawable="@drawable/bn_yes_bg"/>
<item android:state_checked="false" android:drawable="@drawable/bn_no_bg"/>
</selector>
提示:本范例中涉及到的<selector>标签将在后面章节中详细介绍。
范例3:控制文字的显示位置。1
2
3
4
5
6
7
8
9
10
11public void onClick(View view) {
ToggleButton switchbtn = (ToggleButton) view;
// 若当前按钮处于选中状态。
if (switchbtn.isChecked()) {
// 将按钮上的文本左对齐。
switchbtn.setPadding(0, 0, switchbtn.getWidth() / 2, 0);
} else {
// 将按钮上的文本右对齐。
switchbtn.setPadding(switchbtn.getWidth() / 2, 0, 0, 0);
}
}
语句解释:
-  当ToggleButton的状态改变时,除了会改变按钮的background属性外,还会将按钮上的文本的位置改变。
-  提示:如果需要改变按钮的状态,通过使用setChecked(boolean)或者toggle() 方法可以实现。
第五节 样式和主题
Android中的Styles与网页设计中的CSS相似,允许你将设计从内容中分离出来,即可以预先定义一些Styles,然后用这些Styles美画各种控件,这样做可以减少大量的重复代码。
例如,使用一个style,你可以将下面这个布局:1
2
3
4
5
6<TextView
android:layout_width="fill_parent"
android:layout_height="wrap_content"
android:textColor="#00FF00"
android:typeface="monospace"
android:text="@string/hello" />
变成这样:1
2
3<TextView
style="@style/CodeFont"
android:text="@string/hello" />
语句解释:
-  本范例将一些可以公用的属性从XML布局中移出,放到一个名为CodeFont的style定义中,然后各个TextView控件都可以使用style属性引用它。你将在下面章节中看到此style的定义。
当一个style被作到Activity或者Application上时,我们就称它为theme。
例如,你能把CodeFont style作为theme应用于一个Activity,那么这个Activity中所有文本都将是绿色等宽字体。
样式
若想创建style,则需保存一个XML文件到你的工程的res/values/目录下,文件的名称可以随便定义。
范例1-1:定义样式。1
2
3
4
5
6
7
8<resources>
<style name="CodeFont">
<item name="android:layout_width">fill_parent</item>
<item name="android:layout_height">wrap_content</item>
<item name="android:textColor">#00FF00</item>
<item name="android:typeface">monospace</item>
</style>
</resources>
语句解释:
-  每个style都使用一个<style>元素来表示,该元素有一个用来唯一标识该style的name属性(这个属性是必需的)。
-  在<style>内部可以添加多个属性,每个属性使用一个<item>元素表示。
-  在本范例中,CodeFont就是样式的名称,它内部包含了4个属性。
-  当某个控件使用此样式时,实际上就是在使用样式内部的各属性的值。
范例1-2:定义样式2。1
2
3
4
5
6<resources>
<style name=".20STYLE">
<item name="android:textColor">#FF0000</item>
<item name="android:text">20sp</item>
</style>
</resources>
语句解释:
-  第4行代码的含义为:将控件的“android:text”属性的值设置为20sp。
范例2:使用样式。1
2
3
4
5<TextView
style="@style/.20STYLE"
android:layout_width="wrap_content"
android:layout_height="wrap_content"
android:text="周•杰伦\n崔•杰伦/>
语句解释:
-  使用控件的style属性可以为当前控件设置一个style。
-  在本范例中TextView控件的字体的颜色为FF0000字体的大小为20sp。
颜色常量有四种常见的书写格式:
#RRGGBB
-  6位十六进制的数字。其中RR代表红色。GG代表绿色。BB代表蓝色。
#AARRGGBB
-  8位十六进制的数字。其中AA代表颜色的透明度。 00代表完全透明,FF代表完全不透明。
#ARGB
-  4位十六进制的数字。
#RGB
-  3位十六进制的数字。
范例3:样式继承。1
2
3
4
5
6
7
8
9<resources>
<style name="STYLE_WH">
<item name="android:layout_width">wrap_content</item>
<item name="android:layout_height">wrap_content</item>
</style>
<style name="STYLE_TEXT" parent="STYLE_WH">
<item name="android:textColor">#FF0000</item>
</style>
</resources>
语句解释:
-  使用<style>标签的parent属性,可以为当前style设置一个父style。子style会完全继承父style所设置的属性。
范例4:就近优先原则。1
2
3
4<Button
style="@style/STYLE_TEXT"
android:textColor="#00FF00"
android:text="崔•杰伦\n崔•杰伦"/>
语句解释:
-  若在style和控件中同时对某个一个属性指定了值,则按照就近优先原则,这和CSS是一样的。
-  本范例中,字体最终的颜色为绿色。
范例5:属性继承2.0。1
2
3
4
5
6
7
8
9<resources>
<style name="STYLE_WH">
<item name="android:layout_width">wrap_content</item>
<item name="android:layout_height">wrap_content</item>
</style>
<style name="STYLE_WH.STYLE_TEXT">
<item name="android:textColor">#FF0000</item>
</style>
</resources>
语句解释:
-  可以通过改变style名称的写法,来继承指定的style,命名规则为:“父style名.当前style名”。你可以像这样继续继承很多次,只要修改句点之前的名称。
-  若指定的父style不存在,则会报错。范例1-2中的“.” 没有这种含义,它仅仅代表一个字符“.”。
-  这种技巧仅适用于将你自己定义的资源链接起来。你不能用这种方式继承Android内建的style。要引用一个诸如TextAppearance的内建style,你必须使用parent属性。
一些提示:
-  若View不支持style中某些属性,那么该View将应用那些它支持的属性,并忽略那些不支持的。
-  一些style属性只能被当作一个theme来应用,而不支持任何View元素。
   -  如用于隐藏应用标题(windowNoTitle)、隐藏状态栏或改变窗口背景(windowBackground)的style属性。
-  如果一个style应用到一个ViewGroup上,那么子View元素并不会继承应用此style属性(只有你直接应用了style的元素才会应用其属性)。
主题
用于Activity或者整个应用程序的style我们称之为主题(Theme)。
范例1:定义主题。1
2
3
4<style name="FullScreen">
<item name="android:windowNoTitle">true</item>
<item name="android:windowFullscreen">true</item>
</style>
语句解释:
-  windowNoTitle属性指出Activity是否取消标题栏。
-  windowFullscreen属性指出Activity是否全屏显示。
范例2:引用主题。1
2
3<activity
android:name="org.cxy.web.TowActivity"
android:theme="@style/FullScreen" />
语句解释:
-  此Activity中的每个View都将应用FullScreen所支持的属性。
-  在清单文件中使用<activity>标签的android:theme属性来引用建立好的style。
-  若使用<application>标签的android:theme属性引用style,则style将作用于该应用程序内的所有Activity。
范例3:引用值。1
2
3
4<style name="FullScreen">
<item name="android:windowNoTitle">true</item>
<item name="android:windowFullscreen">?android:windowNoTitle</item>
</style>
语句解释:
-  使用“?”可以引用某个属性的值。
-  本范例中windowFullscreen属性的值引用了windowNoTitle属性的值。