本章来介绍一下Android开发中常用的几种资源。
第一节 Drawable
在Android中,Drawable类用来表示一个图像。
通常我们会把Drawable对象设置到View的background属性上进行显示。
目前Drawable有很多子类,这些子类分别用在不同的应用场景,接下来会介绍一些常用的子类。
BitmapDrawable
我们开发时,项目里所能使用的图片资源仅支持三种格式的位图:png、jpg、gif,而BitmapDrawable就是用来表示位图文件的。
创建BitmapDrawable有两种方式:通过位图文件、通过XML文件。
位图文件
直接将位图文件放到res/drawable目录下即可,图片的名称就是位图资源的ID,在程序中可以通过资源ID引用图片。
范例1:当一个图片保存在res/drawable/myimage.png ,下面就是xml来使用此图到一个View上:1
2
3
4<ImageView
android:layout_height="wrap_content"
android:layout_width="wrap_content"
android:src="@drawable/myimage" />
语句解释:
-  在程序运行时,系统会先使用R.drawable.myimage来创建出一个Bitmap对象。
-  然后再使用这个Bitmap对象来创建一个BitmapDrawable对象,BitmapDrawable为Bitmap提供了若干新的功能。
Drawable顾名思义就是可画的、可编辑的,因而Bitmap对象可以通过BitmapDrawable类进行编辑。
范例2:获取图像宽高。1
2
3
4
5
6
7
8
9
10
11
12
13
14
15
16public class AndroidTestActivity extends Activity {
private ImageView img;
private BitmapDrawable drawable;
public void onCreate(Bundle savedInstanceState) {
super.onCreate(savedInstanceState);
setContentView(R.layout.main);
this.img = (ImageView) this.findViewById(R.id.icon);
this.drawable = (BitmapDrawable) this.img.getDrawable();
// 设置当前Drawable对象的透明度,取值范围:0 ~ 255 ,255为完全不透明。
this.drawable.setAlpha(35);
// 获取位图文件的尺寸。
System.out.println("width="+this.drawable.getBitmap().getWidth());
System.out.println("height="+this.drawable.getBitmap().getHeight());
}
}
语句解释:
-  当想获取位图文件的宽高时,可以先调用drawable.getBitmap()方法获取Bitmap对象。
XML文件
我们也可以使用XML文件来定义一个BitmapDrawable,使用此种方式定义可以为图像设定抖动、是否启动图片抗锯齿等附加属性。
范例1:在res/drawable目录下建立bitmap.xml。1
2
3<bitmap
xmlns:android="http://schemas.android.com/apk/res/android"
android:src="@drawable/a" />
语句解释:
-  在xml文件中使用<bitmap>标签来描述一个BitmapDrawable,xml文件名称就是图片的资源ID。
-  其中<bitmap>标签必须包含src属性,该属性用来指出一个位图文件。
-  引用xml文件和引用普通位图文件的方式是完全一样的。
语法:1
2
3
4
5
6
7
8
9
10<bitmap
xmlns:android="http://schemas.android.com/apk/res/android"
android:src="@[package:]drawable/drawable_resource"
android:antialias=["true" | "false"]
android:dither=["true" | "false"]
android:filter=["true" | "false"]
android:gravity=["top" | "bottom" | "left" | "right" | "center_vertical" |
"fill_vertical" | "center_horizontal" | "fill_horizontal" |
"center" | "fill" | "clip_vertical" | "clip_horizontal"]
android:tileMode=["disabled" | "clamp" | "repeat" | "mirror"] />
属性解释
-  antialias:是否允许抗锯齿。开启后会让图片的边线变得平滑。
-  dither:如果位图与屏幕的像素配置不同时是否允许抖动。比如位图的像素配置是ARGB_8888,但手机的屏幕配置是RGB555,这时候开启抖动选项可以让位图显示不会过于失真。
-  filter:是否允许对位图进行滤波。当对位图进行缩放或者压缩时,开启过滤效果可以获得较好的显示效果。
-  gravity:位图的gravity。当位图小于其容器的尺寸时,使用gravity属性指明在容器的何处绘制该位图。
-  tileMode:平铺模式。repeat是简单的水平和垂直平铺,mirror是镜面投影效果,clamp不好描述,请自行测试。
NinePatchDrawable
NinePatchDrawable是一个可以伸缩的位图图像,它可以将自己调整到指定的尺寸,并保证不失真。
另外,NinePatchDrawable必须由一个png图片来创建,NinePatchDrawable与普通png图像不同的是:
-  它的四条边上包括额外的1个像素的边界。
-  它的后缀名为“.9.png”。
你可以使用sdk\tools\draw9patch.bat工具来将普通的png图片修改为*.9.png的图片,该工具非常直观的展示了图片在上下或左右拉伸时的效果以及作为背景时其内容显示的位置。
虽然.9.png图片是在.png基础上制作出来的,但它在项目中的引用方式和png图片完全一样。
NinePatchDrawable也可以在XML文件中定义,使用<nine-patch>标签即可,它支持的属性与BitmapDrawable一致。
LayerDrawable
LayerDrawable表示一种层次化的图像,它可以将多张图片叠加成一张图片,类似于帧布局的效果:

语法:1
2
3
4
5
6
7
8
9
10<layer-list
xmlns:android="http://schemas.android.com/apk/res/android" >
<item
android:drawable="@[package:]drawable/drawable_resource"
android:id="@[+][package:]id/resource_name"
android:top="dimension"
android:right="dimension"
android:bottom="dimension"
android:left="dimension" />
</layer-list>
范例1:在res/drawable目录下建立icon.xml。1
2
3
4<layer-list xmlns:android="http://schemas.android.com/apk/res/android">
<item android:drawable="@drawable/b" />
<item android:drawable="@drawable/a" />
</layer-list>
语句解释:
-  在layer-list下的每一个<item>都表示一个图像,drawable属性表示图像资源。
-  当layer-list下有多个<item>时,先出现的<item>元素会被放在下面。如:在本范例中a图片会放在b的图片的上面。
范例2:其他属性。1
2
3
4
5
6
7
8<layer-list xmlns:android="http://schemas.android.com/apk/res/android">
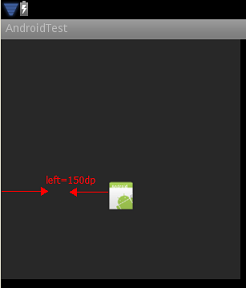
<item
android:drawable="@drawable/icon"
android:top="140dp"
android:right="150dp"
android:left="150dp"
android:bottom="20dp" />
</layer-list>
效果图:

<item>标签:
-  top、right、left、bottom属性,
-  指出图片的最小padding,即图片距离View某一边实际的padding必须大于等于指定的距离。
-  若指定的padding超过了View所占据的大小,则将缩小图片,以保证属性的值生效。
范例3:引用此图片。1
2
3
4
5<ImageView
android:layout_width="300dp"
android:layout_height="300dp"
android:src="@drawable/layout_list"
android:id="@+id/ico"/>
语句解释:
-  若此时调用ImageView的getDrawable方法,返回值的类型为: LayerDrawable 。
层列表中所定义的图片是可以动态的改变的,与位图资源一样,若想对图片进行编辑,则需要获取图片资源的Drawable对象。
范例4:点击事件。1
2
3
4
5
6<layer-list xmlns:android="http://schemas.android.com/apk/res/android">
<item android:drawable="@drawable/b" />
<item
android:id="@+id/content"
android:drawable="@drawable/a" />
</layer-list>
语句解释:
-  本范例中为<item>标签设置一个ID 。
动态更新图片:1
2
3
4
5
6
7
8
9
10
11
12
13
14
15
16
17
18
19public class AndroidTestActivity extends Activity {
private ImageView img;
private Resources rs;
public void onCreate(Bundle savedInstanceState) {
super.onCreate(savedInstanceState);
setContentView(R.layout.main);
this.img = (ImageView) this.findViewById(R.id.img);
this.rs = this.getResources();
}
public void onClick(View view){
// 通过Resources类获取一个新的LayerDrawable对象。
LayerDrawable drawable=(LayerDrawable)rs.getDrawable(R.drawable.layer);
// 修改新对象的层。
drawable.setDrawableByLayerId(R.id.content,rs.getDrawable(R.drawable.icon));
// 将新对象设置给ImageView。
this.img.setImageDrawable(drawable);
}
}
语句解释:
-  层列表类型的图片资源在程序运行的时候,其内的多张图片会被转成一幅图片。
-  因此在动态更新图片时,需要重新创建一个新的LayerDrawable对象。
范例5:实现如下效果。

代码为:1
2
3
4
5
6
7
8
9
10
11<layer-list xmlns:android="http://schemas.android.com/apk/res/android">
<item>
<bitmap android:src="@drawable/android_red" android:gravity="center" />
</item>
<item android:top="10dp" android:left="10dp">
<bitmap android:src="@drawable/android_green" android:gravity="center" />
</item>
<item android:top="20dp" android:left="20dp">
<bitmap android:src="@drawable/android_blue" android:gravity="center" />
</item>
</layer-list>
语句解释:
-  <item>内部可以嵌套其他类型的Drawable。
StateListDrawable
StateListDrawable类似于单选按钮,它里面可以包含多张图片,但是同一时间只显示一张。
StateListDrawable可以根据View的当前状态,来决定要显示哪一张图片。
语法:1
2
3
4
5
6
7
8
9
10
11
12
13
14
15
16<selector xmlns:android="http://schemas.android.com/apk/res/android"
android:constantSize=["true" | "false"]
android:dither=["true" | "false"]
android:variablePadding=["true" | "false"] >
<item
android:drawable="@[package:]drawable/drawable_resource"
android:state_pressed=["true" | "false"]
android:state_focused=["true" | "false"]
android:state_hovered=["true" | "false"]
android:state_selected=["true" | "false"]
android:state_checkable=["true" | "false"]
android:state_checked=["true" | "false"]
android:state_enabled=["true" | "false"]
android:state_activated=["true" | "false"]
android:state_window_focused=["true" | "false"] />
</selector>
语句解释:
-  constantSize属性:设置StateListDrawable的固有大小是否不随着其状态的改变而改变,因为状态的改变会导致StateListDrawable切换到具体的Drawable,而不同的Drawable具有不同的固有大小,true表示StateListDrawable固有大小保持不变,这时它的固有大小是其内部所有Drawable的固有大小的最大值,默认值为false。
-  variablePadding属性:设置StateListDrawable的padding是否随着其状态的改变而改变,与constantSize属性类似,默认值为false。
范例1:在res/drawable目录下建立state_list.xml。1
2
3
4<selector xmlns:android="http://schemas.android.com/apk/res/android">
<item android:state_focused="false" android:drawable="@drawable/input_out" />
<item android:state_focused="true" android:drawable="@drawable/input_over" />
</selector>
语句解释:
-  使用<selector>标签创建一个StateListDrawable。
-  本范例的含义为,当View获得焦点时显示input_over,失去焦点时显示input_out。
范例2:老规矩,引用它。1
2
3
4
5<EditText
android:layout_width="150dp"
android:layout_height="wrap_content"
android:hint="输入 账号"
android:background="@drawable/state_list" />
语句解释:
-  当文本框获得和失去焦点时,系统会自动更新文本框的background属性所使用的图片。
匹配原则:
-  当View的状态被改变时,系统会使用View当前的状态和此文件内所有的<item>匹配。
   -  匹配的顺序:从上到下,从左到右依次匹配每一个<item>标签。
   -  匹配的原则:
      -  若View的当前状态与某个<item>标签匹配成功,则将View的背景色设置为该<item>标签指定的色值,并不会再继续匹配,直接返回。
      -  若匹配失败,则继续匹配下一个<item>标签。
      -  若直到最后都没有一个<item>匹配成功,则将为View设置黑色的背景。
      -  若某个<item>标签没有指定任何具体的状态,则意味着该<item>可以和任何状态匹配,因此应该把没有指定状态的<item>标签放到文件的最后书写。
   -  也就是说,并不是基于用“最佳匹配”的算法来选择的,而仅仅遇到第一个符合最低标准的就会被使用。
属性介绍:1
2
3
4
5
6
7
8
9
10
11
12
13
14
15
16
17android:state_pressed 控件是否被按下(一个点击事件由按下、抬起两个事件组成)。
android:state_focused 控件是否获得焦点。
使用滑轮或键盘的方向导航键导航到某一个控件上,此控件就得到了焦点(会被高亮显示,在模拟器容易看到)。
android:state_selected 控件是否被选中。比如一个tab被打开。
android:state_checkable 控件是否处于可选状态。
这个属性仅仅用于那些可以在“可选”和“不可选”两种状态之间过渡的控件,如RadioButton。
android:state_checked 控件是否处于选中状态。
这个属性仅仅用于那些可以在“可选”和“不可选”两种状态之间过渡的控件,如CheckBox。
android:state_enabled 控件是否处于可用状态。
android:state_window_focused 应用程序的窗口是否处于聚焦状态。
通知罩(即通知栏被拉下后的半透时界面)被打开时或者一个对话框(dialog)出现时,后面的窗口就处于失焦状态。
范例3:多个属性。1
2
3
4<item
android:state_focused="true"
android:state_enabled="false"
android:drawable="@drawable/input_over" />
语句解释:
-  在<item>标签中,可以同时设置多个属性。
-  本范例中,当且仅当View被禁用且获得焦点时,才会将该View的背景图片设置为input_over。
范例4:pressed属性。1
2
3
4<selector xmlns:android="http://schemas.android.com/apk/res/android">
<item android:state_pressed="true" android:drawable="@drawable/input_over" />
<item android:drawable="@drawable/input_out" />
</selector>
语句解释:
-  当View被用户按下时,View会转变为pressed状态。
-  pressed状态通常用在:Button、EditText、Spinner等可点击的控件之上。
-  注意:TextView和ImageView等控件默认是不会产生pressed状态的,但若将其的clickable属性设置为true,则就会产生pressed状态。
范例5:checked属性。1
2
3<item
android:state_checked="true"
android:drawable="@drawable/input_over" />
语句解释:
-  此属性是专为RadioButton、CheckBox、ToggleButton等控件设定的。当按钮被用户选中时,按钮会转变为checked状态。
-  RadioButton和CheckBox可以同时触发pressed和checked两种状态,先pressed后checked。
-  提示:普通的Button按钮不会触发checked状态。
范例6:引用color值。1
2
3<item
android:state_checked="true"
android:drawable="@color/green" />
语句解释:
-  正如你看到的那样,我们也可以是用一个色值。
LevelListDrawable
LevelListDrawable也类似于单选按钮,它可以根据Drawable的当前等级,来决定要显示哪一张图片。
范例1:在res/drawable目录下建立levle.xml。1
2
3
4
5
6
7
8
9
10
11<level-list xmlns:android="http://schemas.android.com/apk/res/android">
<item android:drawable="@drawable/a" />
<item
android:drawable="@drawable/b"
android:minLevel="1"
android:maxLevel="10" />
<item
android:drawable="@drawable/c"
android:minLevel="11"
android:maxLevel="20" />
</level-list>
语句解释:
-  使用<level-list>标签描述一个等级列表,每一个<item>标签代表一张图片,<item>标签的drawable属性为必选。
-  <level-list>标签对应于LevelListDrawable类。
-  在本范例中,当<level-list>的当前等级x与某个<item>标签的minLevel和maxLevel属性满足关系:minLevel <=x<= maxLevel 时,该<item>标签所对应的图片将被显示。
-  若某个<item>标签没有指定minLevel和maxLevel属性,则它们的默认取值都为0 。
-  若有两个或以上的<item>标签同时匹配,则系统会选择最先扫描到的,选择之后就不再继续向下匹配。
范例2:更改等级。1
2
3
4
5
6
7
8
9
10
11
12
13
14
15
16
17public class AndroidTestActivity extends Activity {
private ImageView img; // 图片。
private EditText text; // 文本框,用来让用户输入等级。
public void onCreate(Bundle savedInstanceState) {
super.onCreate(savedInstanceState);
setContentView(R.layout.main);
this.img = (ImageView) this.findViewById(R.id.img);
this.text = (EditText) this.findViewById(R.id.text);
}
public void onClick(View view){
int level = Integer.valueOf(this.text.getText().toString());
Drawable drawable = this.img.getDrawable();
// 根据用户输入的等级,设置Drawable的等级。
drawable.setLevel(level);
}
}
语句解释:
-  若想在程序中动态的为LevelListDrawable添加等级,则可以使用LevelListDrawable类的addLevel方法。
TransitionDrawable
TransitionDrawable用于实现两个Drawable之间的淡出淡入的效果。
范例1:transition.xml。1
2
3
4<transition xmlns:android="http://schemas.android.com/apk/res/android">
<item android:drawable="@drawable/a" />
<item android:drawable="@drawable/b" />
</transition>
语句解释:
-  使用<transition>标签描述一个TransitionDrawable,每一个<item>标签代表一张图片。
-  系统会默认显示第一张图片,若指定的<item>的个数大于2,则只有前两个<item>有效。
-  系统从第一张图片过渡向第二张图片后,第二张图片会覆盖到第一张图片的上面,但是第一张图片并不会消失,因此实际应用中,通常第二张图片的尺寸会大于等于第一张图片的尺寸,以达到完全覆盖的目的。
范例2:过渡图片。1
2
3
4
5
6
7
8
9
10
11
12
13
14public class AndroidTestActivity extends Activity {
private ImageView img; // 图片。
public void onCreate(Bundle savedInstanceState) {
super.onCreate(savedInstanceState);
setContentView(R.layout.main);
this.img = (ImageView) this.findViewById(R.id.img);
}
public void onClick(View view){
TransitionDrawable transition=(TransitionDrawable)img.getDrawable();
// 从第一层的图片过渡到第二层的图片。在3000毫秒内完成过渡。
transition.startTransition(3000);
}
}
ClipDrawable
ClipDrawable可以根据Drawable的当前等级,来裁剪另一个Drawable,即只显示图片的某一部分内容。
范例1:clip.xml。1
2
3
4<clip xmlns:android="http://schemas.android.com/apk/res/android"
android:drawable="@drawable/login_input"
android:clipOrientation="horizontal"
android:gravity="left" />
语句解释:
-  使用<clip>标签描述一个剪切图片资源。 <clip>标签的drawable属性为必选。
-  clipOrientation属性:表示裁剪的方向,取值为:vertical(按照垂直方向裁剪),horizontal(按照水平方向裁剪)。
-  gravity 图片的起始方向,取值:left(从左向右),bottom(从下向上)等。
范例2:设置等级。1
2
3
4
5
6
7
8
9
10
11
12
13
14public class AndroidTestActivity extends Activity {
private ImageView img; // 图片。
private ClipDrawable clip;
public void onCreate(Bundle savedInstanceState) {
super.onCreate(savedInstanceState);
setContentView(R.layout.main);
this.img = (ImageView) this.findViewById(R.id.img);
this.clip = (ClipDrawable) this.img.getDrawable();
}
public void onClick(View view){ // 最初时,图片的等级为0,此时图片将完全不显示。
clip.setLevel(clip.getLevel()+1000);
}
}
语句解释:
-  使等级的取值范围为:0~10000。0代表完全不显示图片,10000代表完全显示图片。
ShapeDrawable
ShapeDrawable可以通过颜色来画出一幅图片,它既可以是纯色的,也可以是渐变色的。
范例1:shape文件。1
2
3
4<shape xmlns:android="http://schemas.android.com/apk/res/android"
android:shape="rectangle" >
</shape>
语句解释:
-  本范例绘制了一个矩形,至于矩形的尺寸、颜色等信息并没有指定,因此若直接使用本范例,则是无法在屏幕中看到矩形的。
-  android:shape属性的取值有:
   -  rectangle (矩形),是默认形状。
   -  ring(环形)
   -  oval (椭圆形)
   -  line (直线),这个形状要求<stroke>元素来定义线的宽度。
在<shape>内部支持6个子标签,用来设置图形的不同属性,下面将依次介绍。
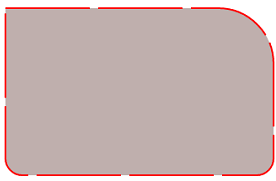
范例2:圆角矩形。1
2
3
4
5
6
7
8
9
10
11
12
13
14
15
16
17
18
19
20<shape xmlns:android="http://schemas.android.com/apk/res/android"
android:shape="rectangle" >
<!-- 圆角半径 -->
<corners
android:radius="10dp"
android:topLeftRadius="0dp"
android:topRightRadius="33dp" />
<!-- 图像的尺寸 -->
<size
android:height="100dp"
android:width="160dp" />
<!-- 图像的边缘线 -->
<stroke
android:dashGap="5dp"
android:dashWidth="50dp"
android:width="1dp"
android:color="#f00" />
<!-- 图像的填充色 -->
<solid android:color="#bfafad" />
</shape>
语句解释:
-  各个标签书写的顺序是任意的。
效果图:

范例3:各标签的介绍。1
2
3
4
5
6
7
8
9
10
11
12
13
14
15
16
17
18
19
20
21
22
23
24
25
26
27
28
29
30
31
32
33
34
35
36
37<corners>标签:为形状创建圆角,只有当形状为矩形时才有用。
- android:radius:尺寸数,所有的角的半径,优先级比较低,会被下面四个属性的值覆盖。
- android:topLeftRadius尺寸数,左上角的半径。
- android:topRightRadius尺寸数,右上角的半径。
- android:bottomLeftRadius尺寸数,左下角的半径。
- android:bottomRightRadius尺寸数,右下角的半径。
<size>标签:指定shape的大小。
但一般来说它并不是shape最终显示的大小,因为当shape被作为View的背景显示时,还是会被拉伸或缩小。
- android:height:形状的高。
- android:width:形状的宽。
<solid>标签:固定颜色填充形状。
- android:color:颜色,用到形状上的颜色,作为一个十六进制值或颜色资源。
<stroke>标签:指出图形的边缘线的粗细、颜色、间隔等。
- android:width:线的宽度(粗细),单位:尺寸值或尺寸资源。
- android:color:线的颜色,单位:十六进制值或者颜色资源。
- android:dashGap:虚线与虚线之前的间隔距离,单位:尺寸值或尺寸资源。
- android:dashWidth:每段虚线的长度,单位:尺寸值或尺寸资源。
<gradient>标签:可以设置图形内部的渐变色。
- android:angle:渐变的角度,0度为从左到右,90度是从底到上,必须是45度的倍数,默认为0。
- android:centerX:距离渐变中心的X坐标的相对位置(0 ~ 1.0)。
- android:centerY:距离渐变中心的Y坐标的相对位置(0 ~ 1.0)。
- android:gradientRadius:渐变的半径,只有当android:type="radial"才使用
- android:startColor:开始颜色,作为一个十六进制值或者颜色资源。
- android:endColor:结束颜色,作为一个十六进制值或颜色资源。
- android:centerColor:可选择开始到结束之间的颜色,作为一个十六进制值或颜色资源。
- android:type:渐变模式,有效值如下:
- linear:线性渐变,默认选择。
- radial:辐射渐变,开始颜色也是结束颜色。
- sweep:卷曲线渐变。
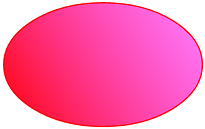
范例4:渐变色。1
2
3
4
5
6
7
8
9
10
11
12
13<shape xmlns:android="http://schemas.android.com/apk/res/android"
android:shape="oval" >
<size
android:height="100dp"
android:width="160dp" />
<stroke
android:width="1dp"
android:color="#f00" />
<gradient
android:angle="45"
android:endColor="#80FF00FF"
android:startColor="#FFFF0000" />
</shape>
效果图:

值得注意的是,只有当android:shape="ring"时<shape>标签的下面的属性才能使用:
-  android:innerRadius:内环半径。
-  android:thickness:环的厚度。
-  android:thicknessRatio:环的厚度比上环的宽度。例如,如果android:thicknessRatio="2",厚度等于环的宽度的1/2,此值被android:innerRadius重写,默认为3.
-  android:useLevel:为"true"时,用于LevelListDrawable,正常情况设为"false"。
其它Drawable
InsetDrawable
InsetDrawable用来将一个Drawable嵌入到其内部,并且在内部留一些间距,类似于padding的效果。
当View希望自己的android:background比自己的实际区域小的时候可以使用InsetDrawable。
范例1:案例。1
2
3
4<inset xmlns:android="http://schemas.android.com/apk/res/android"
android:drawable="@drawable/background"
android:insetTop="10dp"
android:insetLeft="10dp" />
Rotate Drawable
RotateDrawable可以旋转其他Drawable对象,旋转的开始和结束角度可以通过属性控制。
范例1:使用范例。1
2
3
4
5
6
7
8
9
10
11
12
13
14
15
16
17
18
19<rotate xmlns:android="http://schemas.android.com/apk/res/android"
android:pivotX="50%"
android:pivotY="50%"
android:fromDegrees="0"
android:toDegrees="360">
<shape
android:shape="ring"
android:innerRadiusRatio="5"
android:thicknessRatio="15"
android:useLevel="false">
<gradient
android:type="sweep"
android:useLevel="false"
android:startColor="#FF06436e"
android:centerColor="#FF094c7b"
android:centerY="0.50"
android:endColor="#FF127fc4" />
</shape>
</rotate>
语句解释:
-  通过本范例可以看出来各个Drawable是可以相互嵌套使用的。
第二节 ColorStateList
ColorStateList和StateListDrawable类似,它依据View的状态来显示相应的颜色。
范例1:在res/color文件夹下建立my_color.xml文件。1
2
3
4
5
6
7
8
9<selector xmlns:android="http://schemas.android.com/apk/res/android">
<item
android:state_pressed="true"
android:color="#f00" />
<item
android:state_focused="true"
android:color="#0f0" />
<item android:color="#00f" />
</selector>
语句解释:
-  使用<selector>标签创建一个state-list文件,此标签必须为根节点。
-  View的每一个状态使用一个<item>标签来描述,标签常用的属性为color,表示颜色值,其值可以是资源id或者颜色常量。
-  本范例的含义为,当View获得焦点时,View的背景色将被设置为“0f0” ,被按下时,背景色将被设置为“f00”。
范例2:使用颜色状态列表。1
2
3
4
5<Button
android:layout_width="wrap_content"
android:layout_height="wrap_content"
android:text="领奖"
android:textColor="@color/my_color" />
语句解释:
-  当按钮被按下时,按钮上的文字的颜色将变为红色。
第三节 Layout
布局(layout)的基本语法再次就不再重复介绍了,只介绍一些常用的标签。
<requestFocus>
将屏幕的初始焦点设成其父元素,任何表示View类对象的元素都能包含这个内容为空的元素。但每个文件内只能出现一次本元素。
<include>
将另一个布局(layout)文件包含到此标签所处的位置上。
属性:
-  layout:要引用的布局资源。
-  android:id:覆盖包含进来的layout资源中的根view ID。
-  android:layout_height:
   -  覆盖包含进来的layout资源中根view给出的高度,仅在同时给出android:layout_width时才生效。
-  android:layout_width:
   -  覆盖包含进来的layout资源中根view给出的高度,仅在同时给出android:layout_height时才生效。
只要是被包含的layout资源根元素支持的属性,都能在<include>元素中包含进来,并且会覆盖本资源内根元素已定义的属性。
包含layout资源的另一种方式是使用ViewStub。这是个轻量级的View,它在实际被填充之前不占用layout空间。在实际被填充时,它再把android:layout属性指定的layout资源文件动态包含进来。
<merge>
如果希望layout能被其他layout用<include>包含进去,并不再另外生成ViewGroup容器,本元素特别有用。
第四节 String
应用程序可以使用三种类型的字符串资源:
-  配置XML中的普通字符串。
-  字符串数组。
-  具有格式化参数的字符串。
范例1:res/values/strings.xml。1
2
3<resources>
<string name="hello">Hello!</string>
</resources>
XML布局文件把字符串应用到一个View中:1
2
3
4<TextView
android:layout_width="fill_parent"
android:layout_height="wrap_content"
android:text="@string/hello" />
应用程序通过以下代码返回一个字符串:1
String string = getString(R.string.hello);
范例2:字符串数组。1
2
3
4
5
6
7
8<resources>
<string-array name="planets_array">
<item>Mercury</item>
<item>Venus</item>
<item>Earth</item>
<item>Mars</item>
</string-array>
</resources>
范例3:撇号和引号的转义。1
2
3
4<string name="good_example">"This'll work"</string>
<string name="good_example_2">This\'ll also work</string>
<string name="bad_example">This doesn't work</string>
<string name="bad_example_2">XML encodings don't work</string>
语句解释:
-  前两个是正确的范例,后两个是错误的范例。
范例4:字符串的格式化。1
<string name="welcome_messages">Hello, %1$s! You have %2$d new messages.</string>
语句解释:
-  此例中存在两个占位符:%$s是个字符串,%$d是个数字,数字表示参数的序号,从1开始。
在应用程序中可以用如下方式用参数来格式化字符串:1
2Resources res = getResources();
String text = String.format(res.getString(R.string.welcome_messages), username, mailCount);
范例5:用HTML标记来样式化。1
2
3<resources>
<string name="welcome">Welcome to <b>Android</b>!</string>
</resources>
语句解释:
-  支持以下HTML元素:
   -  <b>文本加粗bold。
   -  <i>文本变斜体italic。
   -  <u>文本加下划线underline。
第五节 More Types
范例1:bool类型数据(res/values-small/bools.xml)。1
2
3
4<resources>
<bool name="screen_small">true</bool>
<bool name="adjust_view_bounds">true</bool>
</resources>
程序代码获取:1
2
3
4
5<ImageView
android:layout_height="fill_parent"
android:layout_width="fill_parent"
android:src="@drawable/logo"
android:adjustViewBounds="@bool/adjust_view_bounds" />
范例2:color类型数据(res/values-small/colors.xml)。1
2
3
4<resources>
<color name="opaque_red">#f00</color>
<color name="translucent_red">#80ff0000</color>
</resources>
程序代码获取:1
2
3
4
5<TextView
android:layout_width="fill_parent"
android:layout_height="wrap_content"
android:textColor="@color/translucent_red"
android:text="Hello"/>
语句解释:
-  颜色值通常以 “#” 字符开头,接着Alpha-Red-Green-Blue(透明度-红-绿-蓝)信息。
-  常见的颜色格式有:RGB、ARGB、RRGGBB、AARRGGBB。
范例3:inteter类型数据(res/values-small/integers.xml)。1
2
3
4<resources>
<integer name="max_speed">75</integer>
<integer name="min_speed">5</integer>
</resources>
程序代码获取:1
2Resources res = getResources();
int maxSpeed = res.getInteger(R.integer.max_speed);
范例4:inteter数组数据(res/values/integers.xml)。1
2
3
4
5
6
7
8<resources>
<integer-array name="bits">
<item>4</item>
<item>8</item>
<item>16</item>
<item>32</item>
</integer-array>
</resources>
程序代码获取:1
2Resources res = getResources();
int[] bits = res.getIntArray(R.array.bits);
范例5:数组数据(res/values/arrays.xml)。1
2
3
4
5
6
7
8
9
10
11
12<resources>
<array name="icons">
<item>@drawable/home</item>
<item>@drawable/settings</item>
<item>@drawable/logout</item>
</array>
<array name="colors">
<item>#FFFF0000</item>
<item>#FF00FF00</item>
<item>#FF0000FF</item>
</array>
</resources>
程序代码获取:1
2
3
4
5
6Resources res = getResources();
TypedArray icons = res.obtainTypedArray(R.array.icons);
Drawable drawable = icons.getDrawable(0);
TypedArray colors = res.obtainTypedArray(R.array.colors);
int color = colors.getColor(0,0);